FaxFinder Cloud
Quick Start Guide
Version 1.0
Copyright 2020
Administrator Login
To get started, log in as the administrator.
- Open your Web browser and go to the URL provided by your fax service provider.
- The login screen displays. Log in using the credentials provided by your fax service provider. Note: actual login screen may differ from the image below.
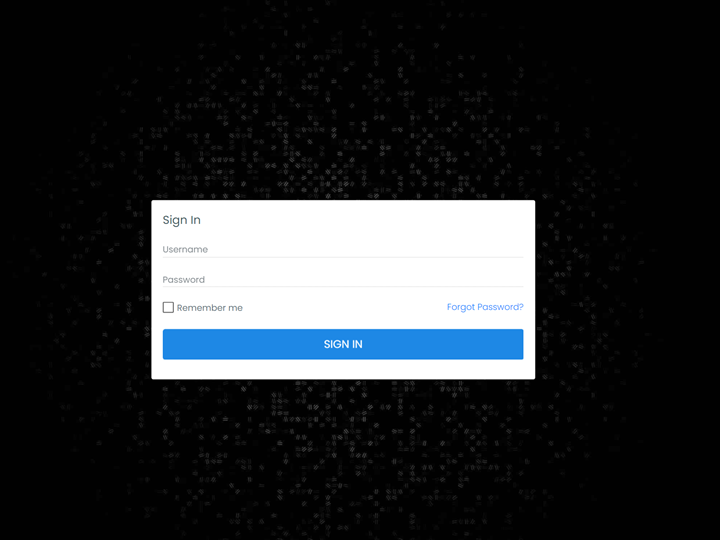
- Click Login.
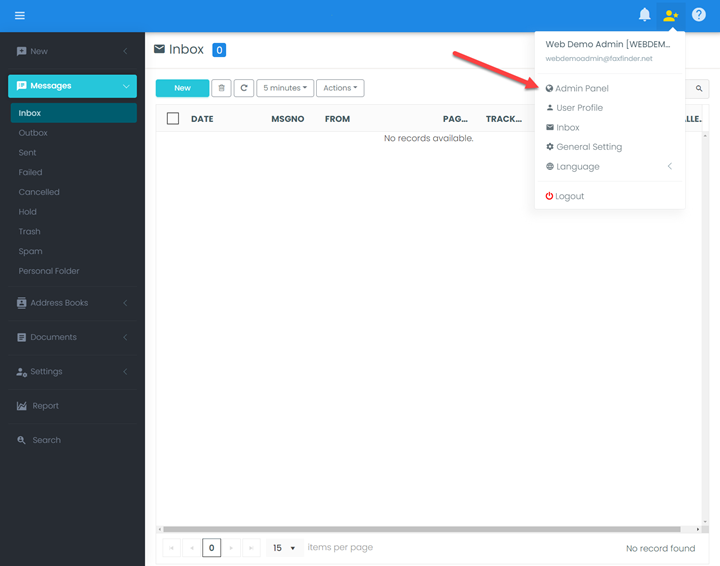
- The user panel displays. To access the admin panel, click the user icon in the upper-right side of the browser interface. Then click “Admin Panel.”
- You can now change the admin password to a password of your choice. For information about changing a user’s data, see the chapter titled “Modifying Users”
Setting up the Fax Service
Before The fax service users can begin sending or receiving faxes, you must perform the following tasks:
- Create domains (Optional). For more information, see the section titled “Domains Management”
- Create users. For detailed instructions, see the section titled “User Management”
- Assign Users to DID Groups. For detailed instructions, see the section titled titled "Working with Faxes & Message" and reference the section “Working with Inbound Faxes”
Domain Management
Overview
Domain structure is similar to Active Directory where administrators can create a forest with a parent domain and child domains underneath.
User settings and configurations are inherited from the Domain Settings. When working with users and domains it is important to understand which settings takes precedence over the other, User or Domain? Below is the order of precedence for settings and configurations:
- User level
- Domain level
User settings will always take precedence over settings even though they are initially inherited from the domain Settings when created. Once created, Administrators can change the user settings to overwrite the Domain settings.
Creating a Domain (Optional)
- This is an optional step because a Domain has already been created for your account which you can use to store users. Domains can be used to manage your organization’s other locations, departments or customers.
- Click the top left Domain navigate bar “System”, the domain menu will pop up in new window.
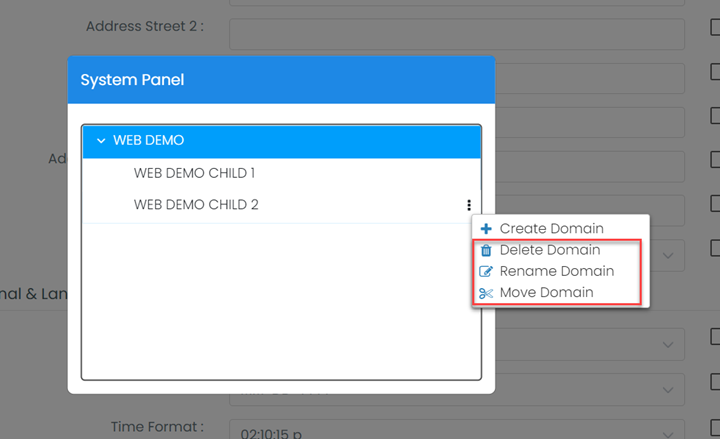
- On the left, the existing domains are displayed as a hierarchy. Right-click on the name of a domain in the list to display the context menu and click the menu icon, select Create Domain to create a new child domain beneath the name you clicked on.

Modifying or Deleting a Domain
- Navigate to Domain Management > Domain Info.
- On the left, the existing domains are displayed as a hierarchy. Click on the name of a domain in the list to display the context menu. You can delete the domain, rename it, or move it to another location in the hierarchy.
- A domain cannot be deleted if it has users in it.
- If you choose the Move Domain option, a dialog box opens that lets you choose the new location in the hierarchy.
User Management
Creating Users
There are two ways to create new users within the fax service:
- Create a user manually
- Import users from a file (if you have more than 15 users, it is recommended you contact support to assist with a CSV upload of users)
Manually Create a User
To create a single new user manually, do the following:
- Navigate to Domain Management > Users.
- Click + A dialog box appears for entering new user data.
- Select the appropriate domain and enter the user’s information. For Authentication Type, leave the setting to Internal.

4. An email address is required for the User Name. You must also click the + button to add the user’s email address to select it as the primary address.
***In this same dialog box, you can define whether or not a user will receive notifications for sent and received fax messages.***
- Password Requirements: Minimum of 6characters, 1 uppercase, 1 lowercase, 1 symbol.
- Click Save.

NOTE: Error messages – e.g., a missing required field – appear at the top right-hand corner of the dialog box. If the creation is successful, the message New user is created is displayed in that position.
Modifying Users
Single User
To change information for a single existing user, follow these steps:
- Navigate to Domain Management > Users.
- If necessary, use the search box at the top, labeled Search Users, to find the desired user.
Note: The search field only searches the selected domain only. For more extensive search, navigate to Utilities > Search > Domain Users

- Click the username. The user dialog box opens.

- Change information as appropriate and click Save.
Multiple Users
There are certain changes that you can perform on multiple users at one time:
- Move user(s) to a different domain
- Set to active/inactive
- Reset password (applies to internal Authentication only. This does not reset the Active Directory password)
- Set privilege level (standard user, super user, administrator)
- Enable external/internal authentication.
Note: If you enable external authentication for a user, that user’s data may be updated if you synchronize the The fax service user database with a Microsoft Active Directory. To avoid that possibility, enable internal authentication for that user.
To perform any of these changes for multiple users, do the following:
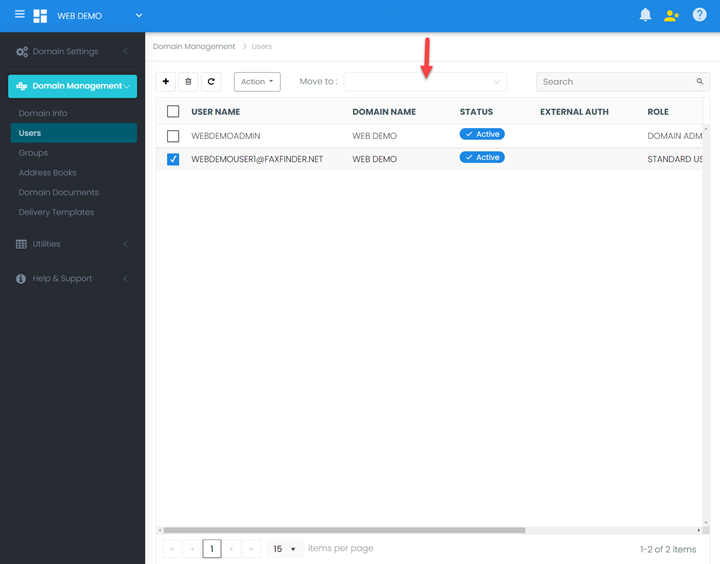
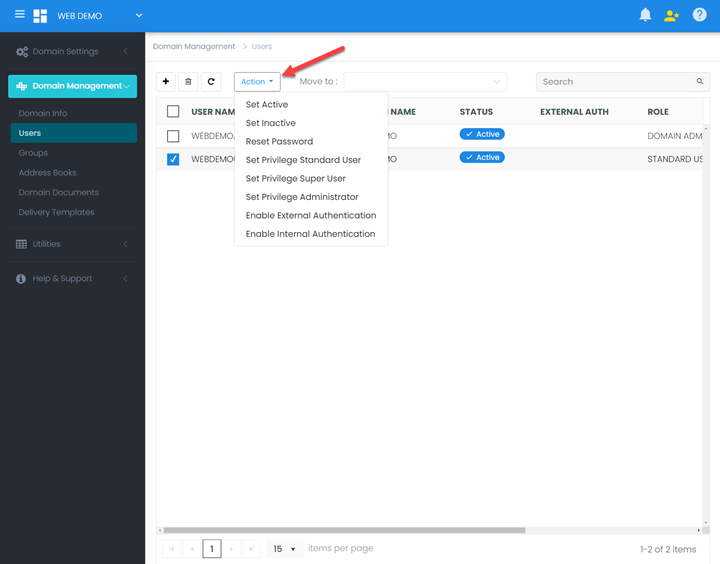
- Navigate to Domain Management > Users.
- Check the box next to the user(s) you want to change.
Note that you can check multiple boxes on one page or all of them at one time by using the check box next to User Name in the header row. However, if you change to a different group of names by using the arrows or page numbers at the bottom of the screen, the boxes you have checked will become unchecked.
- To move the checked user(s) to a different domain, use the Move To: dropdown at the top of the screen.
- To apply any of the other actions listed above to the checked user(s), use the Action dropdown at the top of the screen.
User/Domain Permissions
Permissions Hierarchy
Permissions are set at the domain level for the entire domain. The system administrator can define domain level permissions that in many cases override user level permission set up by domain administrators. For example, the system administrator can specify that a particular domain is not allowed to send international faxes.
Even if the domain administrator specifies that the users can send international faxes, the setting will be overridden by the domain level setting.
Configuring User Permissions
To set permissions for all users in a given domain, navigate to Domain Settings > User Permissions and select the desired domain from the domain dropdown.
Set permissions as desired and click Save to save those settings.
Specific Settings
Send Permissions > Allow http sending
Allow users in domain to send HTTP posts to URL. (example: Post to a Sharepoint Document library)
Send Permissions > Allow ftp sending
Allow users in domain to upload file to FTP folder/locations.
Send Permissions > Allow file sending
Allow users in domain to upload file to folder.
Send Permissions > Allow printer sending
Allow users in domain to print to printer.
Document Permissions > Allow Document Upload
Allow users in domain to upload and share documents.
Document Permissions > Document Quota
Allow users in domain to upload documents up to the specified maximum size.
Note: depending on the specific fax service you are subscribed to, some of these features may be disabled/deactivated.
Notifications Permissions
In order for users to receive email notifications, you must first enable the appropriate user permissions. This is done in the Notifications Permissions section of the page. The permissions in that section have the following meanings:
Allow Notify When Message Receive Success
Notifies the users upon receive success.
Allow Notify When Message Receive Fail
Notifies the users upon receive fail.
Allow Notify When Message Send Success
Notifies the users upon send success.
Allow Notify When Message Send Fail
Notifies the users upon send fail.
Note: By default, these settings are set to “Yes”
Working with Faxes & Messages
Working with Inbound Faxes
Leverage DID Groups for Inbound Routing
Upon setup, your organization’s DIDs are routed to dedicated DID Groups. Individual users can be added to DID Groups if specific users should have access to inbound faxes for specific DIDs.
A dedicated, master admin user will be assigned to each DID Group upon account creation – this user serves as a master archive of all faxes received by your organization. The master admin user will have a placeholder email address assigned – it is recommended you edit this user and assign a new email address for password recovery purposes. At this same time, you can also assign a new password so you can access the master admin user faxes via web browser.

Note: DID Groups need at least one user assigned to the DID Group for successful delivery of inbound faxes.
Add User(s) to DID Group
To assign a user to receive fax for a specific DID:
1. Navigate to Domain Management > DID Groups.
2. Click on a specific DID Group name.

- Select the User you’d like to receive faxes for the specific DID. Click the right-arrow button to move them into the DID Group.
- To remove a User from a DID Group, select the User and click the left-arrow button. We recommend you DO NOT remove the master admin user from any DID Group so you have an master archive of your inbound faxes organization wide.

- When all necessary Users have been added to the DID Group, click Save.
Working with Outbound Faxes
The fax service provides various methods to send outbound faxes.
Print to Fax (The fax service Print Driver)
Users can print to a fax Print Driver from a native application such as Microsoft Word, Excel, Quickbooks, etc. to submit a fax to the fax service.
Web UI
Users can logon to the fax service web interface to submit a fax/message by attaching documents.
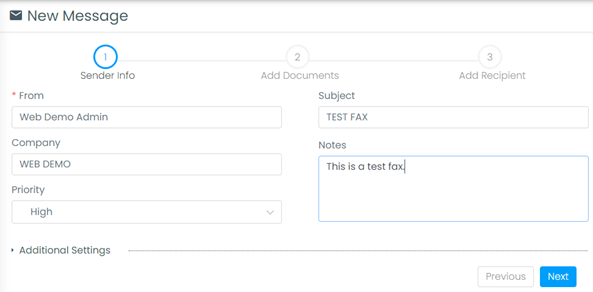
- Within the user interface, click New, then Message.
- Next, enter your Sender Info. This information will be included on the cover page for the recipient. When complete, click Next.
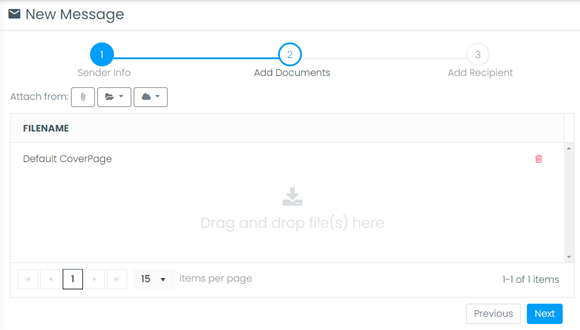
- Drag your files to be sent via fax into the box labeled FILENAME. Multiple files can be combined into one fax. Other attachment options are found above. When all files have been added/attached, click Next.
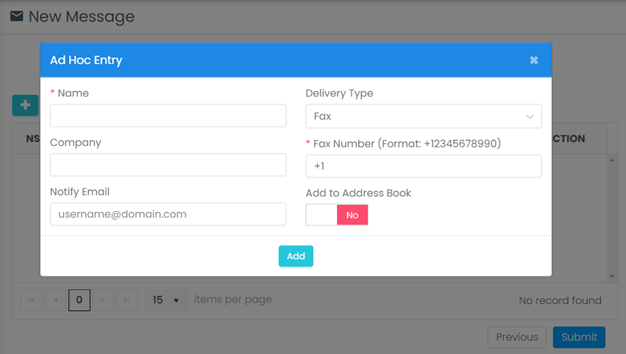
- To add recipients, select Contacts, Users or to add a recipient manually, click the + symbol. Click Add when a recipient is selected. When all recipients have been added, click Submit to send the fax.

Email to Fax
Users added to the fax service can submit outbound faxes via email. To send, simply compose an email:
- Email subject and body will be transposed to a cover page.
- Attach any documents to be included in the fax.
- Send email using the following format: number@faxserviceurl (example: 5551112222@faxfinder.cloud)
Working with Address Books
User Private Address Books
Users can create their own Address books from the The fax service Web User Interface.
Refer to The fax service User Manual for more information on how users can setup their Private Address books.
Global/Public Address Books
Administrators can setup Global/Public address books that are shared across users within a certain domain or system-wide.
The Address Books are Internal, which creates an address book that stores contacts on the fax service Database.
This section will provide information on how to setup the above mentioned address books.
Importing Contacts from CSV
System administrators and users can import contacts from an external data file into a Global/Public The fax service user address book. The import utility
- Allows the import of contacts into one or more distributed groups
- Allows the specification of common default values for fields not present in the external data file
- Supports any line-delimited flat file format, with support of XML data file in a future release.
To use this functionality, navigate to Utilities > Import Contacts.
Import Specification
This section lets you identify the user who owns the contact and to specify the import file and its format.
Use the Browse button next to the Import File input field to specify the file. For the format of the file, you can use the default format defined by The fax service, or you can specify your own format. In the Header Format input field, select The fax service Default Import Header to use the fax service default, or Custom Header to use your own format. If you select Custom Header, a new input field, Control File, appears with a Browse button that lets you point to the file in which you have defined your custom layout.
The The fax service default layout header format specifies that the input fields are to be listed in the following order:
DisplayName, FirstName, MiddleName, LastName, CompanyName, Desc, Email, Fax, Http, Ftp, File, Printer, Mobile, FaxRaw, Phone, CSID/CallerID
Where the fields have the following meanings:
Data Field Name | Description |
DisplayName | Contact’s display name. |
FirstName | Contact’s first name. |
MiddleName | Contact’s middle name |
LastName | Contact’s last name. |
CompanyName | Contact’s company name. |
Desc | Contact’s description. |
Contact’s email address. | |
Fax | Contact’s fax number. |
Http | Contact’s http address. |
Ftp | Contact’s ftp address. |
File | Contact’s file address. |
Printer | Contact's Printer |
Mobile | Contact’s mobile number. |
FaxRaw | Contact’s raw fax number. |
Phone | Contact’s phone number. |
CallerID/CSID | Contact’s CallerID or CSID |
Suppose you create your own very simple control file that looks like this:
DisplayName, Email, Fax
Your import file might then look something like this:
DisplayName, Email, Fax
- John Smith, jsmith@clientcompany1.com, 1-123-123-4567
- Helen Brown, hbrown@clientcompany1.com, 1-222-444-5555
- Martha Jones, mjones@clientcompany2.com, 1-333-444-5555
Note: The first row, which contains the names of the fields. This is optional. You can include it for your own guidance when entering data. However, if you do include that header row, be sure to select Yes in the Has header input field, so that The fax service will ignore that first row.
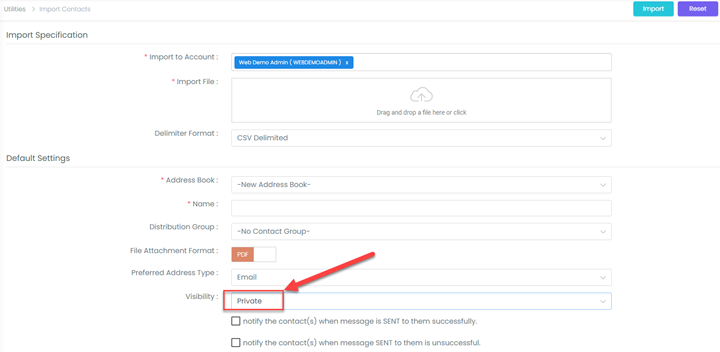
Default Settings
In this section, you specify the following fields:
Address Book: Name of the new address book. The template name must be unique within the owning domain.
Contact Group: Name of the new group.
Contact Groups Description: Distribution group description if the contact group identified above is newly created during the import.
Contact Group View Only: Allow only group to view this contacts.
File Attachment Format: Default file attachment format for addresses.
Prefer Address Type: Primary delivery addresses type for the contact.
Visibility: Defines the visibility of the template to its sub domains. Setting to public allows the template to be used by sub domains.
Monitoring Fax Service
Reports
You can generate a variety of reports online, such as Domain Fax Usage, Total by User, etc.
To access any of these reports, navigate to Utilities > Reports and then click the appropriate link on the right-hand side of the screen. A screen to let you select report parameters opens in a new window.
Creating the Report
The following applies to each of the reports:
You can use the Export dropdown to select from the following report formats:
• Excel
• CSV
Click Generate Report to generate the report in your browser or the printer icon to send it to a printer.
Support
Standard Support Hours: Available Monday thru Friday, 9:00 AM to 9:00 PM Eastern Time (EST/EDT) to active service customers.
Recognized Holidays: New Year’s Day, Presidents’ Day, Good Friday, Memorial Day, Independence Day, Labor Day, Thanksgiving, Black Friday (Day After Thanksgiving), Christmas Day, New Year’s Eve
Web Support: https://support.faxfinder.net The site contains technical information as well as a list of frequently asked questions.
Email Support: Email support is available at support@faxfinder.net.